Sunday, May 22, 2011

Patatas Riojiana (Potatoes Rioja-style with Chorizo)


(Tapas first course)

3 tablespoons Spanish extra virgin olive oil
2 garlic cloves, peeled and chopped
1 small onion, peeled and finely chopped (about 1 cup)
7 ounces chorizo sausage, cut into 1/2-inch thick slices
1/2 pound Idaho potatoes, peeled and cut into 1-inch cubes
1 teaspoon pimenton (Spanish sweet paprika)
1 1/2 teaspoon salt


Warm the olive oil over low heat in a large shallow pan. Add the garlic and cook until lightly browned, about 1 minute.

Add the onions and cook, stirring occasionally, until they are soft and tender and have turned a light brown color, at least 20 minutes. You want the onions to caramelize. If the start to get too dark, add 1/2 tablespoon of water to keep them from burning.

When the onions are caramelized, add the chorizo and continue frying until it too is browned, about 2 minutes. Place the potatoes in the pan and stir to coat them in the oil. Cook for 10 minutes.

Add the pimenton and the salt, pour in water to cover, and bring to a boil. Once it reaches a boil, reduce the heat to low and simmer until the potatoes are cooked through and the water has reduced by half, about 20 minutes. You'll end up with a wonderful, thick stew.


From Jose Andres (Made in Spain)

Wednesday, March 30, 2011

Ad Hoc At Home: Cream of Cauliflower Soup with Red Beet Chips (Course 1)

Cream of Cauliflower Soup with Red Beet Chips

  • 2 heads cauliflower (4 to 5 pounds total)
  • 4 tablespoons (2 ounces) unsalted butter
  • ¾ cup coarsely chopped onion
  • ¾ cup coarsely chopped leeks (white and light green parts only)
  • ¼ teaspoon Yellow Curry Powder or Madras curry powder
  • Kosher salt
  • 2 cups milk
  • 2 cups heavy cream
  • 2 cups water
  • Peanut or canola oil for deep-frying
  • 1 medium beet
  • 1 teaspoon distilled white vinegar
  • Torn Croutons (see belwow)
  • Extra virgin olive oil
  • Fresh ground pepper

The unctuous, velvety, creamy texture of this soup is so elegant and satisfying. Curry offsets the richness and cauliflower florets, croutons, and beet chips give the soup some body and crunch.

Remove the leaves from the cauliflower, and cut out the core. Trim off the stems and reserve them. For the garnish, trim 2 cups florets about the size of a quarter and set aside.

Coarsely chop the remaining cauliflower and the stems into 1-inch pieces so that they will cook in the same amount of time. You need 8 cups of cauliflower (reserve any extra for another use).

Melt 3 tablespoons of the butter in a large saucepan over medium heat. Add the onion, leeks, curry, and coarsely chopped cauliflower, season with 2 teaspoons salt, cover with a parchment lid,

Pour in the milk, cream, and water, increase the heat to medium high, and bring to a simmer. Simmer for 30 minutes, skimming off the foam from time to time.

Working in batches, transfer the cauliflower mixture to a Vita Mix (leave an opening in the lid for the steam to escape). Begin pureeing the cauliflower on the lowest speed and blend, slowly increasing the speed, until smooth and velvety. Check the seasoning and add more salt if needed. Transfer to a large saucepan and keep warm. (The soup can be refrigerated for up to 2 days.)

Fill a small deep pot with 1 inch of peanut oil and heat over medium heat to 300 degrees F. Set a cooling rack over a baking sheet. Line the rack with paper towels.

While the oil heats, peel the beet and slice off about ½ inch from the top. Using a Japanese mandolin or other vegetable slicer, slice the beet into rounds that are slightly thicker than paper-thin. Reserve only the full rounds.

Carefully add a few beet rounds to the oil and fry, turning them with a wire skimmer or slotted spoon as the edges begin to curl and pressing gently on the chips to keep them submerged. You will see a great deal of bubbling around the beets as the moisture in them evaporates; when the bubbling stops, after 1 to 1 ½ minutes, the beets will be crisp. Transfer the beets to the paper-towel-lined rack and season with salt. Fry the remaining chips in batches. The chips can be kept warm in a low oven.

Bring a medium saucepan of salted water to a boil. Add the vinegar and the reserved cauliflower florets and blanch until tender, 4 to 6 minutes. The vinegar will help keep the cauliflower white. Drain.

Melt the remaining 1 tablespoon butter in a medium frying pan over medium-high heat, swirling the pan occasionally, until the butter turns a rich golden brown. Add the florets and sauté until a rich golden brown. Set aside.

Pour the soup into a serving bowl or soup tureen. Top each serving with a few cauliflower florets, several torn croutons, and a stack of beet ships. (If the beet chips sit in the soup, they will be come soggy and discolor it.) Drizzle with olive oil and sprinkle with pepper. Serve the remaining florets, croutons, and chips in separate bowls on the side.

SERVES 6 (MAKES ABOUT 2 QUARTS)

(Page 127)


Torn Croutons

  • 1 loaf country bread
  • Garlic Oil (see below)
  • 2 tablespoons (1 ounce) unsalted butter

Cooking the torn pieces of bread very, very slowly is the key to these garlicky croutons. When toasted over high heat, croutons become a little dry; these absorb the oil and butter through the slow cooking, and the result is croutons that are very crunchy but bursting with the flavor of the oil when you bite into them. We serve these in many salads.

Cut the crusts off the loaf of bread. Tear the bread into irregular pieces no larger than 2 inches. You need about 3 cups of croutons; reserve any remaining bread for another use.

Pour 1/8 inch of the garlic oil into a large sauté pan and heat over medium heat until hot. Spread the bread in a single layer in the pan (if your pan is not large enough, these can be cooked in two smaller pans). Add the butter. The oil and butter should be bubbling, but if you hear sizzling, the heat is too high. Adjust the heat as necessary, and stir the croutons often as they cook. Cook until the croutons are crisp and a beautiful rich golden brown on all sides, 15 to 20 minutes. Move the croutons to one side of the pan and keep warm until ready to serve. (Do not drain on paper towels; you want the flavors of the oil intermingled with the other ingredients as you eat the croutons in a salad.) Torn croutons should be used the day they are made; you can reheat them in a low oven before serving if necessary.

MAKES 3 CUPS

Note: If you don’t have any garlic oil on hand, pour 1/8 inch of canola oil into a sauté pan, add 5 crushed, peeled garlic cloves, and heat over low heat until the garlic cloves are golden brown, flipping the cloves from time to time. Remove the garlic cloves and use the oil for the croutons.

(Page 274)


Garlic Confit and Oil

  • 1 cup peeled garlic cloves
  • About 2 cups canola oil

Cut off and discard the root ends of the garlic cloves. Put the cloves in a small saucepan and add enough oil to cover them by about 1 inch – none of the garlic cloves should be poking through the oil.

Set the saucepan on a diffuser over medium-low heat. The garlic should cook gently: very small bubbles will come up through the oil, but the bubbles should not break the surface; adjust the heat as necessary and/or move the pan to one side of the diffuser if it is cooking too quickly. Cook the garlic for about 40 minutes, stirring every 5 minutes or so, until the cloves are completely tender when pierced with the tip of a knife. Remove the saucepan from the heat and allow the garlic to cool in the oil.

Refrigerate the garlic in a covered container, submerged in the oil, for up to 1 week.

MAKES 1 CUP

(Page 266)


Source: Thomas Keller Ad Hoc At Home – Family Style Recipes (Artisan)

Sunday, March 13, 2011

Har Gow Supplemental


Ha Gow - Test Run


We followed the recipe pretty closely for the filling, choosing bamboo shoots as the compliment to the shrimp, as well as using mirin and black bean sauce as suggested. Peeled and de-veined shrimp from Marina Market helped with process. The filling turned out straightforward and pretty tasty. The only caveat is that we found cutting the shrimp pieces smaller (instead of the 1/2" in the recipe) made filling the dumplings easier.


The dough came next. We got wheat starch from Marina Market and tapioca flour from Whole Foods.


Rolling out the dough went smoothly. The only curious part of the recipe was the hot chicken stock, more on this later. The dough was formed into rolls and cut into pieces.


We made wrappers from individual pieces by pressing them with a heavy pot between wax paper, and some slight enlarging with a rolling pin after.


Making pleats were a little difficult, especially given the hand made wrappers. We found our Ha Gow somewhat like regular dumplings in appearance, but overall not too bad looking.


The moment of truth. We steamed a few dumplings and the rejects to test the taste. It actually tasted pretty good, to our surprise. The filling was flavorful and the shrimp and bamboo shoots went together well. However, the wrapper left something to be desired. The wrappers had the translucent quality you normally see in Ha Gow, but were colored a bit yellow and were a bit overly chewy. The yellow color we believe came from the chicken stock (other recipes used water).

Ha Gow 2.0. Since we had some filling left, we decided to make another try at the dough and wrapper, this time choosing a water based recipe, to hopefully get rid of the yellow and chewy-ness. We found this recipe instead:

1 1/2 cups wheat starch
2 Tbsp tapioca starch
1 cup boiling water
1 Tbsp lard (we used veg. oil)

Supposedly this came from the book "Classic Deem Sum: Recipes from Yang Sing Restaurant, SF." by Henry Chan (http://www.amazon.com/Classic-Deem-Sum-Henry-Chan/dp/0030715466). We felt this was auspicious since we like Yank Sing.


We also watched some youtube videos on making wrappers, and found that some chefs used their cleavers to flatten the dough. So we decided to try this route, putting vegetable oil on both the table and the cleaver. We found this actually worked very well, and was faster than the rolling pin and produced thinner wrappers.


After making up dumplings with the rest of the filling, we decided to steam a few rejects again to taste the new recipe. The result was a success! The wrappers were translucent as before, and did not have the yellow coloring. They also weren't as chewy and tasted fairly close in texture to restaurant ha gow. For future dumplings we will definitely use the new dough recipe and the cleaver flattening method.

Lotus Leaf Wraps (Lo Mai Gai)

This dish is not hard to make, but does take a long time to prep. We started at 6pm and ended at midnight. so watch out for a long prep time.

The recipe says it makes 8 and we doubled it but actually still only got 8 servings, so the portion sizes are a bit off.

Also, the steaming of the rice is what took forever to get the right texture -- instead of 40 min (if you double the recipe it is 40 instead of 20 min) it actually took us about double the time (80 min). One thing we did wrong was to cram all the rice into one bamboo steamer, but after taking forever, we realize we should have separated the portion to two steamers going at the same time. This went faster but the overall process still took some time.

What was time consuming was also the presoaking of the leaves, rice, and mushrooms, and all the chopping. Then you had to wait until the rice and chicken mixture were both cooled enough to then wrap individually. Like I said, this is definitely not a 30 minute meal!!

Once everything was prepped however, the cooking and assembly was pretty simple. Going to steam these just in time for our meet-up tomorrow. Since this made 8 exactly, we didn't get a chance to taste them yet. The chicken mixture was tasty though, so hopefully they will come out good tomorrow.


Saturday, March 12, 2011

Portuguese Egg Tarts: Test Run.


Portuguese Egg Tarts are some of my favorite dessert/snacks. I'd get them in the Chinese bakeries out here almost whenever I see them. However, the best ones I've had where in Macau. There, the custard was rich and creamy, but the crust was the standout. It was puff pastry, and it flaked as you bit into it.

I picked this dessert because I wanted to learn how to make it at home, and to see if I could get it to be more like the ones I've had in Macau.

Looking on the web, most of the recipes were similar. They consisted of the same ingredients for the most part, with a few being different ratios, and others adding in other flavor components like lemon skin and cinnamon sticks. I choose one to use as a baseline.

We followed the recipe exactly to get an idea of a baseline recipe, so that later during our club meal, we could try to adjust to get it even better.


First off, after making the custard it seemed like it wasn't enough. It said the recipe would produce 20 tarts. However, after reading the recipe again, it was for mini tarts. So we rolled the puff pastry like the recipe directed, then cut the roll into pieces, which we put into the mini-muffin pan. The method we used here then, was to press in the center, then push up the pastry up the sides of the walls of each muffin. The difficulty in this was that the pastry tended to break on the top, and it didn't look great. On our next try, we'll try another method that I researched as well as this one. We'll flatten out the puff pastry, roll it out thin, then cut it into circles, then lay it into the pan. Also, we decided that using the mini-muffin pan created a higher pastry to custard ratio. So we will use normal-sized muffin pans instead to get them to the same size as the ones you get in a restaurant.

One thing to note while stirring and cooking the custard, is that you have to know your kitchen. When a recipe says "medium," what is medium heat on your range? So as I cooked and stirred I watched the custard carefully so we wouldn't have any curdling of the egg.


After getting everything ready and into the oven, we let it bake for 12 minutes. Then we broiled the tarts for 2-3 minutes. As I opened up the oven door, I notice a minor burning smell. I immediately pulled out the pan, and it was a little burnt on top. This is another area where you have to watch over the tarts carefully. Next time, I would put the pan more towards the middle of the oven. We put it 4" from the top like the recipe said, but we found that it was too close and wasn't really cooking the tarts evenly.

One option that we might try on our next run, is to use a torch instead of the broiler. That way, we can control the "charring" on the top without overcooking the rest of the tart.

Another challenge with this dish is its presentation. So that is an area we'd want to work on, especially in the pastry. Using the press down method, we tended to get uneven thicknesses and broken areas. Also, when we tasted the tarts, the pastry wasn't as flaky as I would have liked.


Into the pan.


Ready for the oven.


A little charred.

The custard wasn't quite as rich as I remembered them usually tasting. And the lemon flavor came out too strong, which may have taken away from the creaminess. I did more research by looking at other recipes, and one possible change would be to use more egg yolks (one recipe called for double the eggs than this recipe). Also, we could get more complex flavors by infusing other herbs/spices. One idea which we may try is cardamom and lime, instead of lemon and cinnamon.

Wednesday, March 9, 2011

Xiao Long Bao

First a short story on my experience with this food, and then a reasoning on why we decided to choose it for cooking club.

I'm actually not sure the first time I had xiao long bao, but something makes me think it was at 168 in 2000, possibly ordered by Ying during a lunchtime meal. At any rate, despite 168 being "the best Chinese food in the east bay" -anonymous (A. Yen) source, the "soup dumplings" didn't blow me away, and somewhat set the benchmark for what I came to expect from xlb as a dish: somewhat thick, grayish/brown skin, wrapped around a meat filling which may or may not have included the actual "soup" ingredient.

Fast forward to late 2011, when Ei-Lun took me to the fabled Original Din Tai Fung in Taiwan on Xinyi road. There was so much hype about this place, and not just this resturant, but the particular location, the original, that I didn't bother trying to discount the hype. Instead, I embraced the hype, and held the highest standard possible and fully expected my lofty expectations to be exceeded. As with many of the other food adventures from our Asia-food-adventure trip, once again I realized I had never in my life had "real" xiaolongbao. Whatever I had eaten in the past that shared the same name, had nothing to do with these dumplings; they were simply amazing.

Since that fateful meal, I've tried two other locations of Din Tai Fung, one in Taiwan, and one in Los Angeles, and can now tote the same line as the other fanatics (and family members) which is: "You cannot beat the original Din Tai Fung!"

Knowing the amount of lore around this dish, the incredible technical skill required to form the dumplings, the importance of the filling, the quality of the wrapper, and ultimately the challenge of trying to replicate, or surpass the epic Din Tai Fung dumplings was what enticed us to pick this dish.

So here we are, a few days from cooking club and are only on attempt #1. It's possible we will hit a home-run on the first try, and we've been watching videos and looking at pictures, but I have a feeling this recipe and the many others on the web will get plenty of use by us on our way to Din Tai Fung xiao long bao perfection!

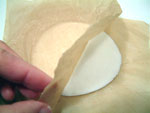
A couple of notes on the ingredients, 99 Ranch didn't have the pork skin, but said to come back tomorrow, they would have it. Whole foods didn't have pig skin, in fact they looked at us funny when we asked. We used a prosciutto for the ham, and we used wheat flour (gluten) for the "high gluten" flour (thanks Agnes!). Also, we bought a can of chili oil from Din Tai Fung in Taiwan for the dipping sauce. (ginger, vinegar, soy sauce, chili oil) We picked up some bamboo steamers in the south bay at a restaurant supply store near Ranch, and got the paper with holes in it, instead of using cabbage. The Din Tai Fung in Taiwan uses actual cloth for that purpose.

Test run notes 3/12: Forget the wrapper recipe here, instead we used one from 
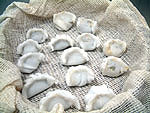
here which only uses water and all-purpose flour. We were also able to use our soba-class skills from Japan to knead the dough to the right consistency. The first try with the recipe below yielded some pretty funky looking dough, and way way too stretchy/rubbery. (also it required sitting for 4hrs, vs. 30mins for the all-purpose flour one) When rolling out the wrapper, get them as thin as possible, nearly see-through. Also, using the recipe below for the soup, you end up with 2 cups of liquid, it says to use only 1 cup for the filling, but save the other cup. When putting together the filling put 2 parts of the filling and 1 part of the coagulated soup. The final test run was with the ultra-thin wrapper, and +extra-soup, and was quite tasty. Holding it up with chopsticks resulted in a see-through, sagging dumpling, filled with pork filling and some steaming hot soup! One step closer to Din Tai Fung, a few thousand left to go...


Base Recipe

Ingredients
Wrapper
  • 3/4 cup high gluten flour
  • 1/3 cup less 1 tablespoon water
  • 1/3 cup plain flour
  • 1/4 cup boiling water
  • flour for dusting
  • 2 teaspoons oil

Soup
  • 180 grams skin of pork
  • 225 grams chicken breast
  • 140 grams pork
  • 60 grams Chinese ham
  • 1 scallion
  • 2 slices ginger
  • Chinese rice wine
  • salt

Filling
  • 285 grams ground pork
  • 2 tablespoons light soy sauce
  • 1/4 teaspoon salt
  • 1 tablespoon ginger and scallion water
  • pepper
  • sugar
  • 2 teaspoons sesame oil
  • 2 teaspoons Chinese rice wine

Making the soup (makes 2 cups. use only one)
Wash and clean pork skin. Parboil in boiling water with the chicken breast and ham. Place all the meat in a saucepan with 6 cups of water. Add scallion and ginger and bring to the boil. Reduce heat and simmer till pork skin is soft. Continue simmering till only 2 cups of liquid remains. Strain and reserve the liquid keeping the pork skin. Diced the saved pork skin. Food process the pork skin and liquid in a blender till milky. Season with salt and leave to cool. Use before it gelatinizes.

Preparing the Filling
Place the ground pork into a mixing bowl. Add salt and light soy sauce. Stir with chopstick or wooden spoon continuously and in one direction only. Add the rest of the ingredients. Continue to stir in the same direction until the mixture forms a thick paste.

Pour in one cup of the prepared soup, a little at a time, stirring to mix thoroughly with the pork.

Wrap in plastic wrap and put in the refrigerator to cool.

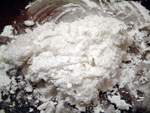
Preparing the wrapper (makes 40 wrappers) 
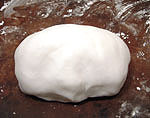
[See above recipe line from the 3/12 test run, instead of this one.]
In a large mixing bowl, mix the 3/4 cups of high gluten flour and 1/3 cup less one tablespoon less water until it resembles bread crumbs. Knead into a dough.

Place the plain flour in a mixing bowl. In a small saucepan bring 1/4 cup of water to the boil. Add the 1/3 cup plain flour and move the saucepan away from the flame, stirring the flour vigorously with a wooden spoon. Leave it to cool a little before kneading together with the high gluten flour dough prepared earlier. Cover with clean damp cloth and leave to rest for 4 hours.
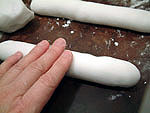
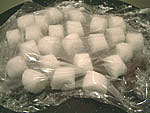
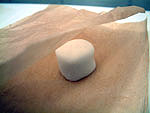
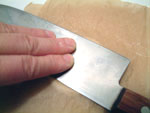
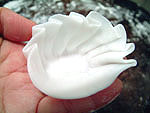
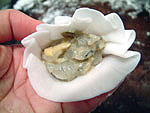
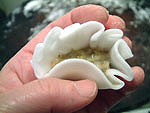
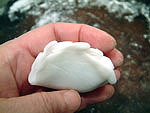
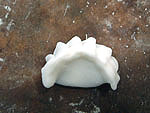
Forming the dumplings
Place 2 teaspoons of oil on the worktop, put the dough on top and knead for a little while. Cut the dough into 4 quarters. Form one quarter into a 2cm roll. Divide the cylinder into 10 pieces. Roll each piece into a ball. Flatten each piece with the palm of your hand into a disk. Use a rolling pin to roll the disk out forming a 6cm disk with the edges thinner than the center. Make a well with you thumb and first finger and drape the disk over. Let it sag in the middle to form a recess for the filling. Use a teaspoon to place 2 teaspoons of filling. Carefully gather the edge of wrapper making folds and holding on to them till fully gathered. Traditionally, 18 folds are made to close the dumpling.

Steaming
Cut out 10 cabbage leaf disks or use thin slices of carrot and stick one piece to the bottom of each dumpling. Place the dumplings in a 200mm bamboo steamer. In a large saucepan or wok, bring water to a rolling boil. Sit the Steamer on a rack over the boiling water, close the lid and steam for seven minutes. The dumpling is done when the filling feels firm to the touch. Serve with a small dish of thinly shredded ginger in vinegar. (and chili oil and soy sauce)

Misc
Video on chowhound.
Another recipe on the web that goes in to greater detail on the ginger-scallion water here.

Wednesday, February 23, 2011

Dim Sum (appetizer) - Ha Gow (Shrimp Dumplings)

This recipe is for 32 dumplings.

Ingredients for the filling:

  • 3/4 lb. (340 g) medium shrimp
  • 1/3 cup (40 g) minced bamboo shoots, water chestnuts or jicama
  • 1 green onion (optional)
  • 2 1/2 tablespoons cornstarch
  • 1 egg white
  • 2 teaspoons sake
  • 1 teaspoon Mirin (sweet sake) or 1/2 teaspoon sugar
  • 1 teaspoon toasted sesame oil [1]
  • 1/2 teaspoon black bean garlic sauce or soy sauce
  • 1/2 teaspoon salt
  • 1/4 teaspoon grated fresh ginger
Ingredients for the dough:
  • 1 1/4 cups (150 g) wheat starch
  • 1/4 cup (30 g) tapioca flour/starch or wheat starch
  • 1 cup (240 cc) boiling hot chicken broth
  • 1/4 teaspoon salt
  • 1 teaspoon vegetable oil

Instructions:

  1. Peel and devein the shrimp. Cut the shrimp into 1/2-inch segments. Mix with the rest of the filling ingredients and set aside.
  2. In a bowl, mix all the dry ingredients for the dough. With wooden chopsticks, stir in the boiling hot chicken broth and the vegetable oil.
  3. Sprinkle wheat starch over a wooden cutting board or other appropriate kneading surface. When the dough is still hot, start kneading the dough until it becomes smooth. If the dough is sticky, you may need to add more wheat starch.


  4. Cut the dough into 4 sections and roll each section into an 8-inch cylinder, using the palms of your hands. For this recipe, cut each cylinder into 8 pieces. Cover with plastic to keep the dough moist while you flatten each piece.


  5. The trick to making the wrapper into a near-perfect circle is to sandwich the piece of dough between two pieces of parchment paper and flatten it using the bottom of a pan. Then you can use a rolling pin to roll them out more. You want your wrappers to be at least 3 1/2" wide.


  6. Fold 8 narrow pleats, where each pleat overlaps the previous pleat halfway. You should leave about 1/3 of the edge without pleats.


  7. While avoiding the edges of the dough, use a small spoon to place a teaspoon of filling into the center of the wrapper.


  8. Press the edges of the dough together, forming a half circle. Put it on your working surface, pressing the bottom of the dumpling. Fill the remaining wrappers until you have about 32 dumplings.


  9. Using a steamer, cook the dumplings over high heat for 7 minutes. Remove the steamer from the heat and let the dumplings settle for 3 minutes before moving them. Serve dumplings hot.


Notes:
[1] There are two main types of sesame oil: Cold-pressed sesame oil and toasted sesame oil. Cold-pressed sesame oil has a light yellow color while toasted sesame oil is dark brown.

Source http://www.anyrecipe.net/asian/recipes/hagow.html

Tuesday, February 22, 2011

Dessert: Portuguese Egg Tart

Baking at a moderately high heat and then switching to broil results in the crème brulee like top. The puff pastry (I used all-butter Dufour brand sold at many high-end grocery stores) makes for a super light shell. You can use your favorite brand or ask a nearby bakery to supply you. Or instead of puff pastry, try a short pastry crust for a tender, rich crust. I used the one that I developed for Singaporean spiced pineapple filled pastries (kuih tart, page 195 in Asian Dumplings). Omit the annatto as that causes the dough to overbrown. If you use this short pastry dough, bake the tarts at 375F for 10 to 12 minutes and then broil them for 3 to 5 minutes. The custard will not puff up like with the puff pastry but the flavor will be just as lovely.

Makes 20 small tarts

Custard

1 tablespoon cornstarch
1 cup half and half, or 1/2 cup cream combined with 1/2 cup whole milk
3 tablespoons sugar
A pinch of salt
3 large egg yolks
1 1/2 inches cassia or cinnamon stick
2 strips lemon peel, each 2 to 3 inches long and 1/2 inch thick (use a vegetable peeler to remove)
1/4 teaspoon vanilla extract

10 ounces frozen puff pastry, thawed according to package directions

1. To make the custard, put the cornstarch into a small, heavy bottomed saucepan. Whisk in a few tablespoons of the half-and-half to dissolve the cornstarch. Then add the sugar, salt, and egg yolks. Whisk to combine. Add the remaining half and half, then whisk to blend. Drop in the cassia and lemon peel.

2. Cook the custard over medium heat, stirring frequently with the whisk or a spoon, for about 8 minutes, until very thick. When the custard gets hot and steam wafts from the pot, stir constantly to ensure even cooking. When done, it should jiggle a bit when you shake the hpan. Remove from the heat, stir in the vanilla extract.

Transfer to a bowl, loosely cover with a piece of parchment or wax paper, making sure the surface touches that of the custard; this prevents a skin from forming. Set aside to cool. (The custard can be prepared up to 3 days in advance and refrigerated. Return to room temperature before using.) Makes 1 1/4 cups.

3. Work with the puff pastry when it is cold as it is much easier to manipulate. Take it straight from the refrigerator and put it on an unfloured cutting board. If necessary, roll it out into a rectangle that is a generous 1/8 inch thick. Pick up one of the longer edges and roll the pastry up into a log that is about 1 inch thick. Roll the log gently to seal well. Tap the ends in to flatten them. Put the log on a parchment paper lined baking sheet, loosely cover with plastic wrap, and refrigerate for 15 minutes.
4. Meanwhile, position the oven rack about 4 inches away from your broiler. Preheat the oven to 400F. Have ready a nonstick mini-muffin pan; each of the 12 wells in such a pan is about 2 inches wide and 5/8 inch deep. Nearby have a small bowl of water and the custard.

5. Remove the pastry log from the refrigerator and cut it in half. Work with one half at a time, keep the other one covered and refrigerated.
Cut the log into 10 even pieces. Put one, with one of the cut sides facing up, in each of the muffin pan wells. If the pastry is hard, let it soften for a couple minutes. Wet one of your thumbs with water, then push it straight down in the center of the dough spiral as if you’re making a thumbprint cookie. Then use the thumb to flatten the pastry against the bottom of the well and then up its sides. Aim for an overall thickness of about 1/8 inch. Work the corner of the well with your index finger as it’s an area where the dough tends to be gather. Then gently push the dough above the rim about 1/8 inch to form a lip. The dough will sink back down as it sits but try your best. If the dough seems too elastic and resists your will, refrigerate the muffin pan for 15 minutes to relax the pastry before giving it another try.

7. Fill each well about 3/4 full. A scant 1 tablespoon is what I typically use. Too little custard and the baked tarts show too much of their tanned shoulders of pastry. Too much custard and the custard will spill out and form a funny looking lava-like flow. Regardless, your tarts will taste great.

8. Slide the muffin pan into the oven and bake for 12 to 13 minutes, until the custard has puffed up into a mushroomlike dome and small cracks form. Then switch on the broiler and broil the tarts for about 3 minutes, monitoring them carefully, until the tops have acquired little caramelized burnt spots. Remove from the oven, let cool for 5 minutes, then unmold by slipping a dinner knife between the pastry and the muffin well. Return the oven temperature to 400F. Let the muffin pan cool, then wipe clean (wash and dry the pan should it be extra dirty). Repeat with the remaining pastry. You’ll have some custard left, which can be eaten right off the spoon.

9. Serve the tarts warm. Leftovers can be reheated in a preheated 300F toaster oven for about 5 minutes, until warm.

Note
You can serve these with a sprinkling of powdered sugar and ground cinnamon.

Source: (http://www.asiandumplingtips.com/2010/01/portuguese-egg-tart-recipe-poh-taht-pasteis-de-belem.html)

Sunday, February 20, 2011

Dim Sum (Main Course) - Lotus Leaf Wraps (Lo Mai Gai)


Lotus Leaf Wraps (Lo Mai Gai)

This popular dim sum dish is made by steaming lotus leaves filled with sticky rice, chinese sausages, and other vegetables.

Serves 8

Ingredients:

· 4 lotus leaves, cut in half

· 1 1/4 cups glutinous rice (sticky rice)

· 4 Chinese dried black mushrooms

· 1 boneless, skinless chicken breast, 6 ounces

· 1/4 teaspoon salt

· 1 tablespoon Chinese rice wine or dry sherry

· 1 teaspoon cornstarch

· 2 Chinese sausages (lop cheong)

· 1 clove garlic, peeled and chopped

· 1 tablespoon Chinese or Japanese rice wine

· 1 tablespoon light soy sauce

· 1 teaspoons dark soy sauce

· 1 1/2 teaspoons cornstarch dissolved in 1 tablespoon water

· 2 tablespoons vegetable oil for stir-frying, or as needed

· 1/4 teaspoon sesame oil

· Freshly ground black or white pepper, to taste

Preparation:

One hour ahead of time, prepare the rice and lotus leaves: Soak the lotus leaves in hot water for 1 hour. Pat dry. Cover the rice with water and let soak for 1 hour. Drain.

Next, steam the rice. Line a bamboo steamer with parchment paper or cabbage leaf. Fill a wok approximately to the half-way point with water so that the steamer will be sitting above the water without touching. Bring the water to a boil cover the rice and steam for about 20 minutes. Remove the rice, cover and keep warm while preparing the remainder of the ingredients.

Soften the dried mushrooms by soaking in hot water for 20 to 30 minutes. Squeeze out any excess water, remove the stems and finely chop.

Cut the chicken into small cubes about the size of a postage stamp. Add the salt, 1 tablespoon rice wine and 1 teaspoon cornstarch. Marinate the chicken for 20 minutes.

Finely chop the sausages. Peel and chop the garlic. In a small bowl, combine the rice wine, light soy and dark soy sauce. In a separate small bowl, dissolve the cornstarch in the water, and whisk into the sauce.

Heat a wok and add 2 tablespoons oil. When the oil is hot, add the garlic and stir-fry until aromatic (about 30 seconds). Add the chicken cubes. Stir-fry until they turn white and are 80 percent cooked through.

Add the sausages and the mushrooms. Stir-fry for a minute. Give the sauce mixture a quick re-stir then add in the middle, stirring quickly to thicken. Season with pepper, to taste. Cook for 1 to 2 more minutes to mix everything together and heat through. Remove from the heat and stir in the sesame oil. Cool.

To make the wraps, separate the rice and the filling into 8 equal sections, 1 section for each wrap. Lay out a lotus leaf in front of you. Place a portion of the rice mixture into the center of a lotus leaf. Add the meat and vegetable mixture over top, shaping the rice with your hands so that it forms a ring around the filling. Add more rice to cover.

Form a square parcel with the lotus leaf and tie it up with twine. Repeat with the remaining lotus leaves.

Steam the lotus leaf parcels, covered, on a heatproof plate in a bamboo steamer for 15 minutes, or until they are done.

Tuesday, February 8, 2011

Making Cannoli


There were not too many ingredients necessary to make cannoli, mainly the sugar, ricotta cheese and chocolate for the filling, the cannoli tubes, and some orange or lemon liquor for the shells.  I got some cointreau since I wanted some anyway, but I'm sure a cheaper liquor would have worked fine.

Following the recipe for the shells, it was clear that there were too little liquid to form a dough.


When the dough came out of the fridge it was too crumbly.  So I ended up adding several additional tablespoons of liquor, until the mixture seemed wet enough to combine, then putting the dough back in the fridge, until it formed into something I can roll out.


I had a pasta maker and it proved invaluable in rolling the dough out to a thin and even thickness.  I rolled the dough out until it fit the widest setting in the pasta maker, then kept feeding it through, reducing the setting on each pass, until I had sheets that were less than 1/8" thick.  I then used a plastic 4" lid to cut out circles.  Most of the extra dough I recombined and fed it through the pasta maker again, and re-cut circles.  This did not seem to affect the taste in the final shells.


While the dough was resting in the fridge, I made the ricotta filling.  Very simple, just combining the chocolate (food processed to tiny chips), orange peel and sugar.  The recipe said to drain the ricotta cheese before, which I did, but almost no liquid came out.  I think perhaps there's a "fresh" ricotta with lots of water that was different from the grocery store kind I got.

Since I had much chocolate left, I also made a second filling of italian chocolate pastry cream using this recipe:

http://www.mangiabenepasta.com/creampuffs.html

I used pastry cream portion with the chocolate variation.  In the end, I actually preferred this chocolate filling over the ricotta, but it's not very traditional.

Wrapping the tubes and frying the shells came next.  I made sure each shell was securely on each tube, and that the end of the tubes were exposed.  I used a medium sauce pan large enough to fit the tubes, and filled it with several inches of oil.  I heated the oil until around 370, and fried one shell at a time, for about one minute.  I used tongs to hold each end of the tube and lower them in the oil.  Then placed them on a rack to drain.  After about 5 minutes, when the shell and tube are cool enough to handle, I took the shells off.  This required a surprising amount of force, but I found that grabbing the shell and twisting the tube usually worked.  Luckily there were only a few cracks and crumbles and no catastrophic shell breaks.

Finally, filling the shells with a pastry bag went pretty smoothly.  Filling each shell from both ends works well.  Dip one end in some crushed pistachio nuts, dust some powdered sugar on top, and the cannoli are ready to enjoy!