Sunday, February 28, 2010

Faux-Blood Orange Sorbet & Candied Orange Peel

This weekend, it was my mom’s birthday, and the “kids” were cooking, so we decided to make a dessert using the Sorbet and the Lemon Tart from our club’s first menu. I took on the task of making the sorbet since I like playing with the ice cream machine. Lee made the tart and she’ll be posting her experience on that separately. We went to Safeway in Mountain View getting supplies for the birthday dinner. We had a bunch of Mandarin Oranges at home (or so I thought), so I didn’t worry about getting more oranges. There were no Blood Oranges at Safeway, so I decided to substitute Mandarin Oranges at home.

When we got home, I found that we only had 15 Mandarin Oranges. So I started squeezing the juice out. The recipe calls for 3 cups of juice. I only managed to get 1 cup out of 15. So then I used lemons (we had a bunch for the tart) to fill in the rest. It took 10 lemons to get me 2 more cups. I followed the recipe thereafter and a had the sorbet in the ice cream machine, while I played some Starcraft 2 Beta. I lost a couple of games, and voila! The sorbet was done. I put it in the freezer, and it waited in there for dessert then following night.

For the Candied Orange Peel, I worked on that prior to dinner. The one problem I had was I couldn't get the temperature high enough, so when the peels were drying after their boil, they didn't crytalize and harden. They remained soggy. But the taste was ok, and they still worked on top of the sorbet.

Since this recipe only had water, sugar, and juice, it required a few minutes to thaw out prior to serving as it had “iced” up. So I let it sit for about 3 minutes while we sang “Happy Birthday” to my mom. She blew out the candle on the lemon tart. Then we cut slices and I tried to shape quenelles with the sorbet, but it was a little “dry” and didn’t stick together that well. This made me want to find another recipe or think of ways to modify this one with some sort of gelling agent to get it more “sticky” like you see with a store-bought sorbet. However the taste was alright, very tart from the lemon, but lacking on the orange flavor. But it worked well for the dinner since we all liked the tartness and it complimented the lemon tart.

Next time, I would try to add a pinch of Xathan Gum to give a slight gel texture to it, and to prevent icing. I had just tried this with some ice cream (put too much), and it definitely stops the icing over, and adds a smooth/creamy texture.


Putting the liquid sorbet into the ice cream machine.


Only could get to 210 degrees. =(


Soggy candied orange peels.


Tarte Au Citron - truly Delicious, some Discoveries...and a few Disasters

This dessert seemed simple enough, although it had multiple parts to it. The ingredients were surprisingly simple. As the title indicates however, there were a few discoveries along the way, some disasters, but overall, the flavor was divinely delicious.

Tarte Au Citron:

- We used Meyer Lemons in this recipe (no particular reasons except that Whole Foods sold them in a bag of 6 which is what we needed). The rind is thin on these lemons so cutting the rinds off was a challenge, even while using the peeler. Fortunately, Tim did all of this work :)

- The pine crust was easy to put together using a KitchenAid Mixer and held up nicely. We refrigerated the dough before filling our tart pan. We didn't have a spring form one but ended up using a ceramic tart pan which worked just fine. Per Ei-Lun's tips, we made sure to cook the crust until it was well done. We did do one addition however, and that was to add a good 1/2 tsp of salt to the crust. I was surprised to see the crust didn't call for any salt. Although this is a dessert (and having the experience of working in a bakery) I know how important a little bit of salt goes in any type of pastries. Later on, when tasting the tart, I was glad we added it for extra flavor.

- The crust had a good melt in your mouth feel and is a crumbly type. But the flavor of pine nuts is just not strong enough to impart a crust that I would deem magnificient in flavor. As I ate it, I kept wondering if a graham cracker based crust or one made of a stronger nut flavor would have tasted better.

The sorbet was the easiest part of this dish. We "cheated" and used fresh squeezed orange juice we bought at the market. However, I don't think I would have tasted the difference between squeezing our own oranges. The sorbet was light, perfectly sweet, and citrus-y for our taste.

We made candied lemon peel since we had all those lemons for the sabayon. Since we used Meyer Lemons, the rind was thin and hard to peel off, let alone slice off into toothpick thick strips, but we (or rather, Tim) managed to meticulously hatch them all. The candied peel started off easy enough as the syrup was easy to prepare. However the recipe called for letting the rinds cool in the pan before you take the rinds off with a fork. I strongly disagree with this step. Similar to Ei-Lun and Kirk's experience, our rind stuck to the water bath as the syrup quickly crystallize. This step happened very very quickly so beware! We had to heat up the syrup again, but that little bit of extra heat took the rind over the top and crystallized the rind into hard pieces of candy. We put them over parchment paper without letting them cool in the pan this time, but it was difficult to get all the syrup out. If you can imagine, our rinds were not in neat strips but captured into crystalized hardened sugar water. Admittedly, we did not have a candy thermometer so we probably went over the 230 degrees. Despite all these mishaps, a few pieces over the sorbet ended up being quite tasty, although a bit crunchy :)

Sabayon Part 1 - this by far was the most finicky step of the dessert. The first time we made it, we followed the recipe to a T and used a water bath, cooking it over 8-10 minutes. Our sauce was thin, however, and never looked thick and smooth as it should have been. A quick search on the internet told us we had not cooked it long enough. By that time, we had already added the butter and it was too late to fix.

Intead of throwing away the sabayon (we had no lemons at the time to start over), I quickly remembered that mini tapioca pearls are used as a thickening agent in berry pies (I happen to love them in pies and had some in the pantry). We put the sabayon back on the burner and added two tbsp of the tapioca. After several minutes, the sabayon developed a nice thickness to it. We let it chill, poured it over the crust and used the broiler method. Later, upon tasting, we found the texture of the tapioca a nice touch texture wise to the tart and actually would consider doing it this way the next time.

Sabayon Part II - Since we had extra pine nut crust left, we decided to try making the sabayon again the next day once we got more lemons. I had read that a double boiler was not necessary and putting the sauce directly over low heat would work. Since our problem was too thin of a sauce from undercooking, I was interested in this method. The sauce did thicken more and instead of 8-10 minutes of total cook time, we cooked it at least for 20 minutes. However, the sauce never thickened to what I would consider thick enough to set even after adding the butter. Since we didn't want to waster the sabayon, we ended up putting it in the oven at 350 degrees for 20 minutes which helped cook the custard. Next came the broiler step but beware, you HAVE to sit and watch the oven! I ran over to Alia to watch her and when I came back 1-2 minutes later, the broiler had put a crust similar to a creme brule crust over the tart. The custard did seem set however.

This second sabayon is in our fridge and I'll update as to the taste and flavor tomorrow.

Sadly, I don't think we mastered making a true sabayon the two times we tried. I'm not sure I am that interested in making it a third time! But if I was, I would cook the sabayon even longer than the 20 minutes and would definitely forgo the water bath as it did not seem necessary.

Overall impression: The flavor of the sabayon (although we didn't totally get it right) was divine, very tart, not too sweet, very fresh tasting. The pine crust had good texture, but not enough of a strong flavor, given the subtle taste of pine nuts. The sorbet was refreshing and light but Tim and I wondered about serving it with the lemon tart. Since the sorbet is "mushy" and so is the tart filling, it didn't seem to go as well together texture wise although delicious on their own. The candied peel was tasty and crunchy and a nice accompaniement to the sorbet, but I wonder if it was supposed to be "crunchy" vs. "chewy." Ours was definitely the former but without a candy thermometer, we'll never know if it was due to overcooking.

Pine nut crust is easy using a KitchenAid mixer

Weighing the dough into 3 parts helped ensured uniformity


Whisking a never-thickening sauce


Sabayon w/ tapioca - prebroiling

Sabayon w/ tapioca - post broiling

Crispy, crunchy candied lemon peel


Orange sorbet, tasty and refreshing

Yum, yum, yum

Monday, February 15, 2010

Tarte Au Citron et Sorbet D'Oranges Sanguines: Tips & Tricks


Sorbet D'Oranges Sanguines
(tips courtesy of David Lebovitz' blog)
  • Varietals. Torocco blood oranges tend to be super-juicy with a lighter color whereas the Moro variety are the most colorful, have the most concentrated flavor, and yield the smaller amount of juice. If using regular oranges, 'juicing' oranges yield the most juice, like Valencia. Oranges from colder climates have thicker skins to protect them from the cold, too. And of course, all are affected by seasonal variations.
  • Temperature. Room temperature citrus is supposed to yield more juice than ones straight from the fridge.
  • Bottled vs. Fresh. Bottled works, fresh is better
  • Texture. You can use champagne or sparkling wine, about 2 tablespoons per cup (250ml) to improve the consistency and keep the texture smoother.
  • Serving. Citrus sorbets are best eaten a few hours after they're churned. If you plan to serve it another day, remove it from the freezer 5-10 minutes prior to serving.


Tarte Au Citron
(tips courtesy of epicurious)
  • Not Lemony Enough? Add the zest of one medium lemon, grated very fine, to the egg and sugar mixture.
  • Broil vs. Torch vs. NOA. Mixed reviews on whether or not the broiling bit at the end adds to it. Next round, we'll likely torch or opt-out of this step.
  • Sabayon. We jumped the gun on adding in the three portions of lemon juice, next time, I would wait for the mixture to thicken a bit more before adding in the liquid portions.
  • Doh! More Butter / Freeze Before Baking. The crust was a bit crumbly for my taste, I wonder if adding more butter in the mixture would have helped with that. Like k mentioned, I think we let the dough get too soft - post-kneading, pre-baking, I might put it in the fridge for about 20-30 minutes in circular format before taking it out, laying it into the pan, and baking it. Also, we should have probably left it in the oven for a few minutes longer to let it brown a bit more.


Candied Citrus Peel
  • Equipment. There has got to be a better/quicker way to do this than to use a fruit peeler. I wonder if a zester would work just as well, or if the strips would come out too thin.
  • Watch the Heat! I was a bit frustrated that the candy thermometer was nowhere near the 230°F reading on the thermometer, so turned up the heat more than I probably should have. Ultimately, I let it get past 230°F as a result. It looked decent upon cooling; however, I let it get stuck in the pot and had to figure out a way to get it out...
  • Timing is Key. Instead, once I turned off the heat, I probably should have immediately lifted the pieces out and laid them flat on parchment paper to cool, then sprinkled sugar over them.

What a week-end...

I thought I'd write a note on behalf of Ei-Lun, the cooking machine, for this week-end. As you know, we were dealing with the damage to our front door from Friday through the week-end, and in to the next week, but we decided we'd better get cookin' for the club regardless.

On Saturday morning, after checking out of the Berkeley Marina Doubletree, we went for brunch on 4th street in Berkeley, and stopped by Sur La Table after. We were still thinking about what to submit, and decided that we'd try to make meyer lemon souffle's. We bought eight ramekins as an initial commitment. After dealing with the locksmith and learning how to replace glass in a door frame at home (we ended up buying a piece of wood to put in the window frame until the glass comes in...it looks quite nice if you ask me) Ei-Lun started going through recipes for the souffle. We eventually settled on "a citrus trio" which would include a lemon tart, blood orange sorbet, and those little gel things you get at Manressa at the start and end of the meal. At that point I was pooped, so I went to take a nap. I'm pretty sure Ei-Lun tried to wake me up several times to discuss the recipe but I wasn't really participating. Later that evening when I woke up, I discovered she had posted an excellent recipe and had nixed the fruit gels, as people online said it was impossible to get the same results from following t-keller's recipe.

On Sunday, I threw the remaining chicken thighs we had from the previous week's sous vide cook-off (a crazy at-office sous-vide & searing extravaganza) in the sous vide machine with salt/pepper/rosemary/butter, anticipating a "eat at home" V-day meal. We actually tried calling a couple of our standbys, Wakuriya in San Mateo and Commis in Oakland, with no luck, but Ei-Lun had a nice chat with the Commis lady. We went back to SLT in Berkeley to return the ramekins and buy a stainless steel bowl, a rolling sheet, a rolling pin, and a candy thermometer. $122 bux at check-out (wthbtw), but we decided to not get the rolling mat (parchment paper would be fine), and found a cheaper bowl. New total: $30; much better. We then hit Camino in Oakland for brunch, and then Whole Foods to get all the ingredients for the dessert. Upon returning home, we were beat, so we slept. Then at 8pm, we got a call from Commis, a cancellation at 9! We had a nice Valentine's dinner at Commis, the couple sitting next to us got engaged at the restaurant, it was interesting. After the meal, I got a cup of decaf, and Ei-Lun, got a cup of regular coffee. hmm...

Returning home, Ei-Lun proceeded to work on the dessert, and pretty much single-handedly, prepped the tart crust, got the sorbet in the ice cream machine, and made the candied orange peels. btw, blood oranges don't have that much juice! We used 13 blood oranges, and only got 2 cups of juice... 18 next time? Also, I found it was easier to juice them if you cut away most of the rind first. Also regarding the crust mixing, I ended up just using my hands (we don't have a kitchen aid) and it worked out just fine. Ei-Lun also tried her hand at the candied orange peel, she later told me she had it perfect, but didn't remove the peels from the sugar bath, so they got stuck in the pan. She heating up the pan a bit more, and didn't like the result. (however, I happen to like the crunchy/sugary ones!) It was off to bed around 3am...

This morning we baked the crust, and made the tart filling, while we sous vide'd some eggs for eggs, break and prosciutto. I think we will bake the crust a little longer next time, and will refrigerate it after rolling it out, per some online suggestions. The crust was too crumbly, and it kind of collapsed when I transferred it to a plate. Also, the tart filling part, I think we could have let firm up a bit more in the water bath. And then instead of broiling, I think we'll hit the top of the tart with the chef's torch instead next time, for a little more control.

As we were leaving to pick up the replacement glass today, we tried the tart. We definately have some adjustments to make! It was quite tasty however. Also the sorbet was awesome, even though it was 2 parts blood orange juice, 1 part water. :)

We definately have things to try for the next run of making the dessert, so I think by March we'll both have the recipe down pat, and will be sick of lemon tarts and citrus sorbet! Also, as a personal note, I think Ei-Lun and I are learning about how to work together better in the kitchen. We definately have different styles, but we end up making tasty food in the end. All in all, we've both learned some new techniques and its got us working together in the kitchen! I'd better start pulling my weight on the cooking assignments instead of sleeping in the future. :)

Sunday, February 14, 2010

Homework on Valentine's Day

Today being Valentine's Day, Tim and I decided to forgo the expensive dinner route traditionally taken and instead kill two birds with one stone. We made courses un and deux of our French Bistro theme. How tres tres efficiente de nous.

As posted, the first course was Moules Mariniere and second course Steak Au Poivre with Herbes Frites.

We made a few modifications to the recipes and techniques and also have a few tips to share.

Moules Mariniere:

- The recipe called for about 4lbs of mussels to serve 4. We decided to get 2lbs since we were only making dinner for two. The mussels looked nice and large in the Whole Foods case, but upon closer inspection at home, we found about 14/ - 1/3 of them to be "dead" meaning they were open. Since this was a relatively expensive treat at $5.99/lb, we would next time make sure to ask the seafood guy to not to give us any dead ones. There was still plenty of mussels to go around for two as a first course, however.

- Don't forget the bread! We forgot this crucial ingredient to sopping up the sauce, a must-have for this type of dish. However, we had some plain white sliced bread in our fridge which did the job nicely, toasted.

- We used dry thyme since the grocer was out of fresh, which was perfectly fine.

This was a delicious and simple dish, the sauce being the best part in my opinion.

Steak Au Poivre:

- We also halved the recipe and instead purchased 2 NY steaks. However, the recipe calls for 4 to 6 oz steaks and we realized upon coming home that we had purchased two steaks, EACH weighing 16oz! That was fine w/ us as we are big meat-eaters However, we mistakenly forgot to adjust the cook time in the oven. The recipe calls for a few minutes of searing and 5 minutes in the oven to finish. We did just that but realized 10 minutes after the steaks were out that they needed more time. So the steaks went in for an additional 8 minutes and were perfectly medium rare when they came out.

- Crushing the peppercorns was hard without a mortar and pestle. We put them in a zip bag and first used a meat pounder. That didn't do the job quite right. We then rolled a wooden rolling pin over the peppercorns. This did result in crushing, however, the pieces were inconsistent as we later found out while eating the steaks. Next time we would use a small grinder of food processer for more consistent and finer grinding.

- We purchased a ready-made "demi-glace" at Whole Foods which you combine with 4 parts water to make a veal stock. It made exactly one cup and this was a lifesaver as we would not have had the time or energy to make home-made veal stock for two people let alone for a mere two steaks. This was found in the dry goods section of Whole Foods near the vinegars, mustards, etc.

Steak Au Poivre was deceptively easy with the ready-made demi-glace (which had great veal flavor). I could do without the crushing of the peppercorn and next time, will try using coarsely ground pepper usiung my automatic grinder. Also next time, I would get one 16 oz steak and split in two as Tim and I were only able to finish half our steak.


Herbes Frites:

- Since Tim is watching his diet and because we wanted to opt for a healthier version than deep frying, we decided to do "oven fries." The recipe was followed exactly with the exception of coating the fries in olive oil and putting them in the oven at 400 degrees. Note, we did not soak the potatoes in water as the recipe instructed as this was not necessary -- this is a step taken when deep frying to remove starch from the potatoes so they do not stick together.

- A note on stickiness - although we coated the potatoes with olive oil before baking, next time, we will make sure to spray the foil as well w/ nonstick as some of the potatoes stuck to the foil.

- At 400 degrees, the potatoes were cooked after 20 minutes, but not brown and crispy. We got that effect by putting them on high broil for 5 minutes which created a nice crust.

I would definitely make these oven fries again, as they tasted relatively good compared to french fries. I would next time try an herb mixture of chives and/or rosemary instead of the chevril, parsley, or thyme which is what the recipe recommended.


Saturday, February 13, 2010

Tarte Au Citron et
Sorbet D'Oranges Sanguines

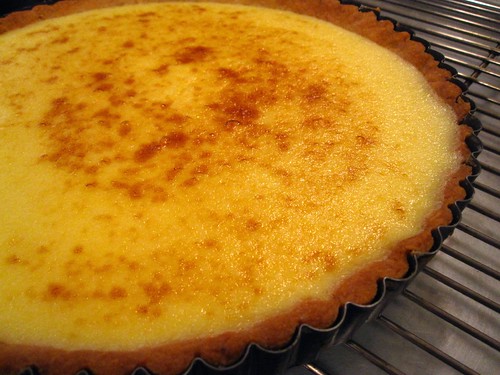
This lemon tart recipe uses a sabayon method, in which the eggs are first cooked with the lemon juice and sugar over hot water, then the butter is gradually incorporated—an easy method that results in a consistently good lemon custard or curd.

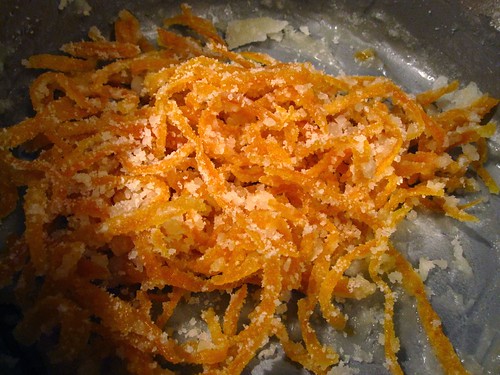
The rich, tart sabayon is housed in a pine nut crust, then topped with a clean and refreshing blood orange sorbet, which, in turn, is topped by candied citrus peel.

Suggested Pairings: Sauternes, Muscat, Alsace Riesling, Alsace Gewurztraminer

Tarte Au Citron:
Serving Size: Eight

Butter and flour for the tart pan
1/3 recipe Pine Nut Crust (optional)
Lemon Sabayon
  • 2 large eggs, cold
  • 2 large egg yolks, cold
  • 3/4 cup sugar
  • 1/2 cup fresh lemon juice
  • 6 tbsp. (3 oz.) cold unsalted butter, cut into 6 pieces
For the Crust:
Preheat the oven to 350°F. Generously butter and flour a 9-inch fluted tart pan with a removable bottom and refrigerate it while the oven preheats.

Remove the tart pan from the refrigerator. Use your fingertips to press the chilled pine nut dough evenly over the bottom and up the sides of the pan. Trim off any excess dough.

Bake the crust for 10 to 15 minutes, then rotate it and bake for another 10 to 15 minutes, or until it is golden brown. Remove the crust from the oven and let it cool while you make the filling. (There may be some cracks in the crust; they will not affect the finished tart.)

For the Sabayon:
Bring about 1 1/2 inches of water to a boil in a pot that is slightly smaller than the diameter of the bowl you will be using for the sabayon. Meanwhile, in a large metal bowl, whisk the eggs, yolks, and sugar for about 1 minute, or until the mixture is smooth.

Set the bowl over the pot and, using a large whisk, whip the mixture while you turn the bowl (for even heating). After about 2 minutes, when the eggs are foamy and have thickened, add one-third of the lemon juice. Continue to whisk vigorously and, when the mixture thickens again, add another one-third of the lemon juice. Whisk until the mixture thickens again, then add the remaining lemon juice. Continue whisking vigorously, still turning the bowl, until the mixture is thickened and light in color and the whisk leaves a trail in the bottom of the bowl. The total cooking time should be 8 to 10 minutes.

Turn off the heat and leave the bowl over the water. Whisk in the butter a piece at a time. The sabayon may loosen slightly, but it will thicken and set as it cools. Pour the warm sabayon into the tart crust and place the pan on a baking sheet.

Preheat the broiler. While the sabayon is still warm, place the tart under the broiler. Leaving the door open, brown the top of the sabayon, rotating the tart if necessary for even color; this will take only a few seconds, so do not leave the oven. Remove the tart from the broiler and let it sit for at least 1 hour before serving. Serve at room temperature or cold.

Optional Accompaniments:

Pine Nut Crust
Note: Yields three crusts - because this dough uses only one egg, it is difficult to make in a smaller quantity. Freeze the extra dough for another time.
  • 10 oz. (2 cups) pine nuts
  • 1/3 cup sugar
  • 1 lb. (3 cups) all-purpose flour
  • 8 oz. unsalted butter, at room temperature
  • 1 large egg
  • 1 teaspoon pure vanilla extract

Preparation:
Place the pine nuts in a food processor and pulse a few times. Add the sugar and flour and continue to pulse until the nuts are finely ground. Transfer the mixture to a large bowl.

Add the butter, egg, and vanilla extract and mix to incorporate all the ingredients (the dough can be mixed by hand or in a mixer fitted with the paddle attachment). Divide the dough into three equal parts. Wrap each piece in plastic wrap and refrigerate for at least 10 minutes before using. (The extra dough can be frozen, wrapped well, for up to 1 month).
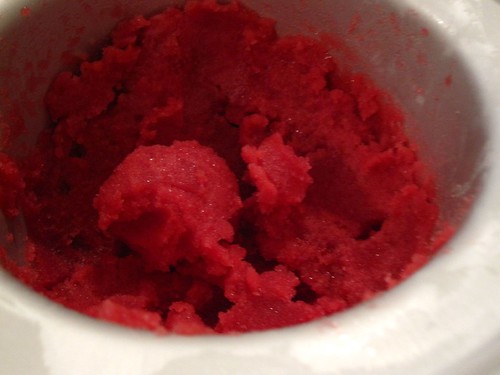
Blood Orange Sorbet
Serving Size: One Quart
  • 1 1/2 cups sugar
  • 1/2 cup water
  • 3 cups strained blood orange juice or fresh orange juice (from about 12 oranges)
Preparation:
Combine the sugar and water in a small saucepan and bring to a boil over medium-high heat, stirring to dissolve the sugar. Transfer to a medium bowl and allow the syrup to cool to room temperature. Add the orange juice and refrigerate until cold.

Transfer to an ice cream machine and freeze according to the manufacturer's instructions.

Candied Citrus Peel
Serving Size: 1 Cup (200 G), Drained
  • 4 large lemons or oranges, preferably unsprayed
  • 2 cups (500 ml) water
  • 1 cup (200 g) sugar
  • 1 tbsp. light corn syrup
  • Pinch of salt
Preparation:
With a vegetable peeler, remove strips of peel 1 inch (3 cm) wide from the lemons or oranges, cutting lengthwise down the fruit. Remove just the colorful outer peel, leaving behind the bitter white pith. Using a very sharp chef's knife, slice the peel lengthwise into very thin strips no wider than a toothpick.

Put the strips of peel in a small, nonreactive saucepan, add enough water to cover them by a few inches, and bring to a boil. Reduce to a gentle boil and cook for 15 minutes. Remove from the heat, strain the peel, and rinse with fresh water.

Combine the 2 cups (500 ml) water, sugar, corn syrup, and salt in the saucepan. Fit the pan with a candy thermometer and bring to a boil. Add the blanched peel, reduce the heat, and cook at a very low boil for about 25 minutes, until the thermometer reads 230°F (110°C). Turn off the heat and let the peel cool in the syrup.

Once cool, lift the peel out of the syrup with a fork, letting the syrup drain away, and serve atop ice cream or sorbet.

Recipe Sources:
Bouchon, 2004
The Perfect Scoop, 2007

Friday, February 12, 2010

Course Deux

Moules Mariniere

Grown all along the coast of France on wooden posts, mussels are regional to many areas but are particularly associated with Brittany, Normandy, and the norhteast. This is one of the simplest ways to serve them.

2 kg (4 lb 8 oz) mussels
40 g (1 1/2 oz) butter
1 large onion, chopped
1/2 celery stalk, chopped
2 garlic cloves, crushed
410 ml (1 2/3 cups) white wine
1 bay leaf
2 sprigs of thyme
185 ml (3/4 cup) thick (double/heavy) cream
2 tablespoons chopped parsley

Serves 4

SCRUB the mussels and remove their beards. Discard any that are open already and don't close when tapped on the work surface. Melt the butter in a large saucepan and cook the onion, celery, and garlic, stirring occasionally, over moderate heat until the onion is softened but not browned.

ADD the wine, bay leaf, and thyme to the saucepan and bring to a boil. Add the mussels, cover the pan tightly and simmer over low heat for 2-3 minutes, shaking the pan occasionally. Us tongs to lift out the mussels as then open, putting them into a warm dish. Throw away any mussels that haven't opened after 3 minutes.

STRAIN the liquid through a fine sieve into a clean saucepan, leaving behind any grit or sand. Bring to a boil and boil for 2 minutes. Add the cream and reheat the sauce without boiling. Season well. Serve the mussels in individual bowls with the liquid poured over. Sprinkle with the parsley and serve with PLENTY OF BREAD.


...And since we have PLENTY OF BREAD (and I really really want to try this), we're gonna add to complement the bread:


Chicken Liver Pate

500g (1lb 2oz) chicken livers
80ml (1/3 cup) brandy
90g (3 1/4 oz) unsalted butter
1 onion, finely chopped
1 garlic clove, crushed
1 teaspoon chopped thyme
60 ml (1/4 cup) thick (double/heavy) cream
4 slices white bread

Serves 6

TRIM the chicken livers, cutting away any discoloured bits and veins. Rinse them, pat dry wtih paper towels and cut in half. Place in a small bowl wiht the brandy, cover and leave for a couple of hours. Drain the livers, reserving the brandy.

MELT half of the butter in a frying pan, add the onion and garlic and cook over low heat until the onion is soft and transparent. Add the livers adn thyme and sti over moderate heat until the livers change colour. Add the reserved brandy and simmer for 2 minutes. Cool for 5 minutes.

PLACE the livers and liquid in a food processor and whiz until smooth. Add the remaining butter, chopped, and process again until smooth. (Alternatively, roughly mash the livers with a fork, then push them through a sieve and mix with the melted butter.) Pour in the cream and process until just incorporated.

SEASON the pate and spoon into an earthenware dish or terrine, smoothing the surface. Cover and refrigerate until firm. If the pate is to be kept for more than a day, chill it and then pour clarified butter over the surface to seal.

TO MAKE Melba toasts, preheat the grill (broiler) and cut the crusts off the bread. Toast the bread on both sides and then slice horizontally with a sharp sesdrrated knife, to give eight pieces. Carefully toast the uncooked side of each slice and then cut it into two triangles. Serve with the pate.

Source: The Food Of France, By Maria Villegas and Sarah Randell (Murdoch Books)

Coquilles St. Jacques à la Fondue d'Endives - Starter

Scallops and endives is a classic bistro pairing. A glass of Sancerre Blanc, Jurançon, or Sauvignon Blanc makes an excellent accompaniment.

Ingredients:
3 tablespoons plus 1/2 cup (4 oz/125 g) butter, cut into 1/4-inch (6-mm) slices
4 Belgian endives, trimmed, halved lengthwise, and sliced crosswise
Salt and freshly ground black pepper to taste
12 sea scallops
Juice of 1/2 fresh lemon
1 tablespoon crème fraîche
1/2 bunch chives, chopped, for garnish

Crème fraîche:
Crème fraîche can be found in specialty food stores and some grocery stores. To make crème fraîche at home, mix 2 cups (16 fl oz/500 ml) heavy cream with 2 tablespoons buttermilk in a mdeium bowl. Cover with plastic wrap and let stand at room temperature overnight or until fairly thick. Refrigerate for at least 4 hours. The cream can be kept in the refrigerator for several days.

Preparation:
In a large sauté pan or skillet, melt 2 tablespoons of butter over medium-low heat and add the endives. Sprinkle with salt and pepper and sauté gently for 5 minutes, or until the endives are tender; set aside.

Season the scallops with salth and pepper to taste. In a large sauté pan or skillet, melt 1 tablespoon of the butter over medium-high heat and sauté the scallops for 2 minutes on each side, or until golden brown.

In a small, heavy saucepan, bring the lemon juice to a boil and whisk in the 1/2 cup (4 oz /125 g) butter one piece at a time. Remove from heat, whisk in the crème fraîche, and season lightly with salt and pepper.

To serve, divide the endive slices among 4 shallow soup bowls or dinner plates. Arrange 5 scallops on top of each serving. Spoon the lemon butter over, sprinkle with the chopped chives, and serve immediately.


Recipe from:
Chez Diane
25, rue Servandoni
75006 Paris

Recipe source

http://www.foodnetwork.com/regional-international/french-bistro-recipes/index.html

3/13 Recipe - 2nd Main Dish

Steak au Poivre with Herbed Frites

Recipe courtesy Emeril Lagasse, 2006

Prep Time:
25 min
Inactive Prep Time:
15 min
Cook Time:
40 min
Level:
Intermediate
Serves:
4 servings

Ingredients

  • 1/2 cup whole peppercorns
  • 2 tablespoons plus 2 teaspoons Dijon mustard
  • 4 (6 to 8-ounce) New York sirloin steaks, trimmed of excess fat
  • 4 teaspoons salt
  • 4 teaspoons olive oil
  • 3 tablespoons minced shallots
  • 1 tablespoon green peppercorns
  • 1 cup Cabernet Sauvignon
  • 1 cup reduced veal stock or demi-glace
  • 1/2 cup heavy cream

Directions

Preheat the oven to 400 degrees F.

Grind whole peppercorns in a spice grinder or with a mortar and pestle until course. Brush 2 tablespoons of the mustard on the steaks, and season on each side with 1/2 teaspoon of the salt and ground peppercorns.

Heat a large skillet until very hot. Add some oil and sear steaks until well browned and crisp on 1 side, about 3 minutes. Flip steaks and put the skillet in oven for about 5 minutes, for medium-rare. Remove steaks from the oven. Place steaks on a dish and cover with aluminum foil to keep warm.

Place the skillet over medium heat. Add the shallots and cook until soft, about 2 minutes. Season with salt and pepper. Add the green peppercorns, then the wine and cook until the liquid has reduced by half. Whisk in the veal stock and cream and bring to a simmer. Spoon the sauce over the steaks and serve immediately with the Frites.

Herbed Frites:

  • 4 large Idaho potatoes, about 2 pounds, peeled and cut into matchstick slices 1/4-inch thick
  • Canola oil, fry frying
  • Salt
  • 1 cup mixed chopped herbs such as chervil, thyme, parsley and tarragon

Place the potato slices in a bowl of water. Let stand 15 minutes. Drain, rinse under cold water, and drain again. Pat dry with towels.

Heat enough oil to come 4 inches up the sides of a large deep saucepan to 350 degrees F. Add the potatoes in batches and cook until just crisp but still yellow, about 5 minutes. Remove from the pan with a slotted spoon and drain on paper towels. Sprinkle with salt and herbs and serve immediately.

Sunday, February 7, 2010

The French Laundromat is in da club.


The French Laundromat is a cooking club started by beautiful, talented, smart and high-achieving individuals whose mission is to "enjoy extraordinary food by cooking more and learning new methods through good friends and company."

Our Values:
- Appreciate good food
- Celebrate friendships
- Be curious
- Keep an open mind
- Be creative
- Remember the journey

Our Commandmants:
- Show up! Take it seriously!

- Document your culinary adventure by committing to updating our club’s blog at least 1x/month for each dish you prepare showing thought process, ingredients, technique, final recipe, and a photo of the dish

- Members must post the recipe they are planning to prepare for the next meeting at least 3 weeks before the meeting. All members must prepare each members' recipe before the meeting and bring the recipe they posted to the meeting.

- Members must bring an appropriate drink pairing (can be non-alcoholic) for their dish to the meeting.

- The dinner will be a four course meal consisting of a starter, first course, second course, and dessert. Members will rotate the type of dish they bring to each meeting.

- Have fun! Don’t take it too seriously. Think outside your culinary box

Sample Themes:

- Cook w/ a main ingredient that is the color _________
- Cook using a new technique
- Cook using a new tool/utensil
- Cook w/ a main ingredient that starts with the letter ___________
- Cook a dish from a particular geographic region (i.e., Southern, Asian, Slavic)
- Recreate a tasting menu item (menu decided beforehand) with your own twist
- Cook a dish that will go well with “x” (i.e., type of beverage, condiment)

Our first meeting will be on Saturday March 13th, 8pm at Tim and Agnes' house.

Team member's recipes must be posted by Friday, Feb 12th.

The theme for our first meeting is "French Bistro" cooking.

Dinner assignment for March 13th:

Starter: Agnes/Tim
1st Course: John/Lee
2nd Course: Andrew/Yurah
Dessert: Kirk/Ei-Lun