
Baking at a moderately high heat and then switching to broil results in the crème brulee like top. The puff pastry (I used all-butter Dufour brand sold at many high-end grocery stores) makes for a super light shell. You can use your favorite brand or ask a nearby bakery to supply you. Or instead of puff pastry, try a short pastry crust for a tender, rich crust. I used the one that I developed for Singaporean spiced pineapple filled pastries (kuih tart, page 195 in Asian Dumplings). Omit the annatto as that causes the dough to overbrown. If you use this short pastry dough, bake the tarts at 375F for 10 to 12 minutes and then broil them for 3 to 5 minutes. The custard will not puff up like with the puff pastry but the flavor will be just as lovely.
Makes 20 small tarts
Custard
1 tablespoon cornstarch
1 cup half and half, or 1/2 cup cream combined with 1/2 cup whole milk
3 tablespoons sugar
A pinch of salt
3 large egg yolks
1 1/2 inches cassia or cinnamon stick
2 strips lemon peel, each 2 to 3 inches long and 1/2 inch thick (use a vegetable peeler to remove)
1/4 teaspoon vanilla extract
10 ounces frozen puff pastry, thawed according to package directions
1. To make the custard, put the cornstarch into a small, heavy bottomed saucepan. Whisk in a few tablespoons of the half-and-half to dissolve the cornstarch. Then add the sugar, salt, and egg yolks. Whisk to combine. Add the remaining half and half, then whisk to blend. Drop in the cassia and lemon peel.
2. Cook the custard over medium heat, stirring frequently with the whisk or a spoon, for about 8 minutes, until very thick. When the custard gets hot and steam wafts from the pot, stir constantly to ensure even cooking. When done, it should jiggle a bit when you shake the hpan. Remove from the heat, stir in the vanilla extract.
Transfer to a bowl, loosely cover with a piece of parchment or wax paper, making sure the surface touches that of the custard; this prevents a skin from forming. Set aside to cool. (The custard can be prepared up to 3 days in advance and refrigerated. Return to room temperature before using.) Makes 1 1/4 cups.
3. Work with the puff pastry when it is cold as it is much easier to manipulate. Take it straight from the refrigerator and put it on an unfloured cutting board. If necessary, roll it out into a rectangle that is a generous 1/8 inch thick. Pick up one of the longer edges and roll the pastry up into a log that is about 1 inch thick. Roll the log gently to seal well. Tap the ends in to flatten them. Put the log on a parchment paper lined baking sheet, loosely cover with plastic wrap, and refrigerate for 15 minutes.
4. Meanwhile, position the oven rack about 4 inches away from your broiler. Preheat the oven to 400F. Have ready a nonstick mini-muffin pan; each of the 12 wells in such a pan is about 2 inches wide and 5/8 inch deep. Nearby have a small bowl of water and the custard.
5. Remove the pastry log from the refrigerator and cut it in half. Work with one half at a time, keep the other one covered and refrigerated.
Cut the log into 10 even pieces. Put one, with one of the cut sides facing up, in each of the muffin pan wells. If the pastry is hard, let it soften for a couple minutes. Wet one of your thumbs with water, then push it straight down in the center of the dough spiral as if you’re making a thumbprint cookie. Then use the thumb to flatten the pastry against the bottom of the well and then up its sides. Aim for an overall thickness of about 1/8 inch. Work the corner of the well with your index finger as it’s an area where the dough tends to be gather. Then gently push the dough above the rim about 1/8 inch to form a lip. The dough will sink back down as it sits but try your best. If the dough seems too elastic and resists your will, refrigerate the muffin pan for 15 minutes to relax the pastry before giving it another try.
7. Fill each well about 3/4 full. A scant 1 tablespoon is what I typically use. Too little custard and the baked tarts show too much of their tanned shoulders of pastry. Too much custard and the custard will spill out and form a funny looking lava-like flow. Regardless, your tarts will taste great.
8. Slide the muffin pan into the oven and bake for 12 to 13 minutes, until the custard has puffed up into a mushroomlike dome and small cracks form. Then switch on the broiler and broil the tarts for about 3 minutes, monitoring them carefully, until the tops have acquired little caramelized burnt spots. Remove from the oven, let cool for 5 minutes, then unmold by slipping a dinner knife between the pastry and the muffin well. Return the oven temperature to 400F. Let the muffin pan cool, then wipe clean (wash and dry the pan should it be extra dirty). Repeat with the remaining pastry. You’ll have some custard left, which can be eaten right off the spoon.
9. Serve the tarts warm. Leftovers can be reheated in a preheated 300F toaster oven for about 5 minutes, until warm.
Note
You can serve these with a sprinkling of powdered sugar and ground cinnamon.
Source: (http://www.asiandumplingtips.com/2010/01/portuguese-egg-tart-recipe-poh-taht-pasteis-de-belem.html)
Tuesday, February 22, 2011

Sunday, February 20, 2011
Dim Sum (Main Course) - Lotus Leaf Wraps (Lo Mai Gai)
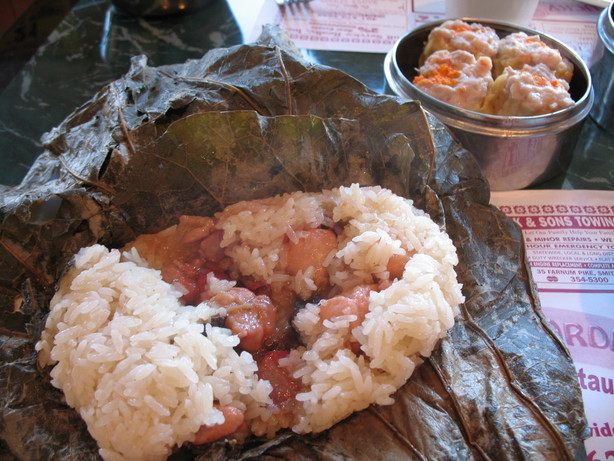
Lotus Leaf Wraps (Lo Mai Gai)
This popular dim sum dish is made by steaming lotus leaves filled with sticky rice, chinese sausages, and other vegetables.
Serves 8
Ingredients:
· 4 lotus leaves, cut in half
· 1 1/4 cups glutinous rice (sticky rice)
· 4 Chinese dried black mushrooms
· 1 boneless, skinless chicken breast, 6 ounces
· 1/4 teaspoon salt
· 1 tablespoon Chinese rice wine or dry sherry
· 1 teaspoon cornstarch
· 2 Chinese sausages (lop cheong)
· 1 clove garlic, peeled and chopped
· 1 tablespoon Chinese or Japanese rice wine
· 1 tablespoon light soy sauce
· 1 teaspoons dark soy sauce
· 1 1/2 teaspoons cornstarch dissolved in 1 tablespoon water
· 2 tablespoons vegetable oil for stir-frying, or as needed
· 1/4 teaspoon sesame oil
· Freshly ground black or white pepper, to taste
Preparation:
One hour ahead of time, prepare the rice and lotus leaves: Soak the lotus leaves in hot water for 1 hour. Pat dry. Cover the rice with water and let soak for 1 hour. Drain.
Next, steam the rice. Line a bamboo steamer with parchment paper or cabbage leaf. Fill a wok approximately to the half-way point with water so that the steamer will be sitting above the water without touching. Bring the water to a boil cover the rice and steam for about 20 minutes. Remove the rice, cover and keep warm while preparing the remainder of the ingredients.
Soften the dried mushrooms by soaking in hot water for 20 to 30 minutes. Squeeze out any excess water, remove the stems and finely chop.
Cut the chicken into small cubes about the size of a postage stamp. Add the salt, 1 tablespoon rice wine and 1 teaspoon cornstarch. Marinate the chicken for 20 minutes.
Finely chop the sausages. Peel and chop the garlic. In a small bowl, combine the rice wine, light soy and dark soy sauce. In a separate small bowl, dissolve the cornstarch in the water, and whisk into the sauce.
Heat a wok and add 2 tablespoons oil. When the oil is hot, add the garlic and stir-fry until aromatic (about 30 seconds). Add the chicken cubes. Stir-fry until they turn white and are 80 percent cooked through.
Add the sausages and the mushrooms. Stir-fry for a minute. Give the sauce mixture a quick re-stir then add in the middle, stirring quickly to thicken. Season with pepper, to taste. Cook for 1 to 2 more minutes to mix everything together and heat through. Remove from the heat and stir in the sesame oil. Cool.
To make the wraps, separate the rice and the filling into 8 equal sections, 1 section for each wrap. Lay out a lotus leaf in front of you. Place a portion of the rice mixture into the center of a lotus leaf. Add the meat and vegetable mixture over top, shaping the rice with your hands so that it forms a ring around the filling. Add more rice to cover.
Form a square parcel with the lotus leaf and tie it up with twine. Repeat with the remaining lotus leaves.
Steam the lotus leaf parcels, covered, on a heatproof plate in a bamboo steamer for 15 minutes, or until they are done.
Tuesday, February 8, 2011
Making Cannoli

There were not too many ingredients necessary to make cannoli, mainly the sugar, ricotta cheese and chocolate for the filling, the cannoli tubes, and some orange or lemon liquor for the shells. I got some cointreau since I wanted some anyway, but I'm sure a cheaper liquor would have worked fine.
Following the recipe for the shells, it was clear that there were too little liquid to form a dough.

When the dough came out of the fridge it was too crumbly. So I ended up adding several additional tablespoons of liquor, until the mixture seemed wet enough to combine, then putting the dough back in the fridge, until it formed into something I can roll out.
I had a pasta maker and it proved invaluable in rolling the dough out to a thin and even thickness. I rolled the dough out until it fit the widest setting in the pasta maker, then kept feeding it through, reducing the setting on each pass, until I had sheets that were less than 1/8" thick. I then used a plastic 4" lid to cut out circles. Most of the extra dough I recombined and fed it through the pasta maker again, and re-cut circles. This did not seem to affect the taste in the final shells.


http://www.mangiabenepasta.com/creampuffs.html
I used pastry cream portion with the chocolate variation. In the end, I actually preferred this chocolate filling over the ricotta, but it's not very traditional.
Wrapping the tubes and frying the shells came next. I made sure each shell was securely on each tube, and that the end of the tubes were exposed. I used a medium sauce pan large enough to fit the tubes, and filled it with several inches of oil. I heated the oil until around 370, and fried one shell at a time, for about one minute. I used tongs to hold each end of the tube and lower them in the oil. Then placed them on a rack to drain. After about 5 minutes, when the shell and tube are cool enough to handle, I took the shells off. This required a surprising amount of force, but I found that grabbing the shell and twisting the tube usually worked. Luckily there were only a few cracks and crumbles and no catastrophic shell breaks.


Friday, February 4, 2011
Monday, January 31, 2011
Italian Lunch
Ei-Lun looks like she belongs in a cooking magazine
 Arancini alla Siciliana
 Bucatini with Chanterelles, Spring Peas and Prosciutto
 Osso Bucco
 Cannoli (pistachio, orange, chocolate)
 Lil Meatball #1
  Lil Meatball #2
Tuesday, January 11, 2011
"Leave the gun. Take the cannoli."

Chocolate Chip–Orange Cannoli (Cannoli di Ricotta)
Epicurious | November 2008
For dough- 1 1/2 cups all-purpose flour
- 1 tablespoon sugar
- 1 teaspoon unsweetened cocoa powder
- 1/2 teaspoon ground cinnamon
- 2 tablespoons chilled unsalted butter, cut into cubes
- 8 tablespoons limoncillo or other lemon or orange liqueur
For filling
- 1 pound (2 cups) fresh sheep's- or cow's-milk ricotta, drained 1 hour in cheesecloth-lined sieve
- 3/4 cup superfine sugar
- 1/3 cup miniature chocolate chips
- 4 tablespoons candied orange peel, chopped, or finely grated zest of 2 oranges
- 1 teaspoon vanilla extract
To fry and serve
- About 8 cups vegetable oil
- 1 egg white, lightly beaten
- Confectioners' sugar for dusting (optional)
- Special equipment: deep-fat thermometer, 4-inch diameter round cookie cutter, 6 (roughly 5 5/8-by-5/8-inch) metal cannoli tubes
Monday, January 3, 2011
Bucatini with Chanterelles, Spring Peas, and Prosciutto
Tim and I were attending a kids/adults new year's eve party and so we decided to test out our pasta recipe. Since we knew there would be a lot of young children at the party, we substituted pinwheel pasta instead of the longer strand and harder to eat bucatini. We also used the much less expensive crimini mushroom instead of Chanterelles. Didn't think little toddlers would be able to discern the flavor of $20/lb mushrooms. Those were the only two substitutions and for our meet up, we will definitely use the "good stuff."
This pasta dish was easy to throw together and subtle in flavor. Just good old-fashioned ingredients. A note on peeling and seeding the tomatoes, this was a much harder task than it would seem and took some time. We found it best to puree by putting the whole peeled and seeded tomatoes in a bowl, cutting up with kitchen shears and then crushing using a potato masher.
I think the dish could have benefitted from some crushed red pepper flakes. Maybe next time, but wouldn't want to make it too spicy for some who might not like too much spice. Also curious to see if the dish will be more flavorful with Chanterelles instead of Crimini. We'll see next week if that is the case.
This pasta dish was easy to throw together and subtle in flavor. Just good old-fashioned ingredients. A note on peeling and seeding the tomatoes, this was a much harder task than it would seem and took some time. We found it best to puree by putting the whole peeled and seeded tomatoes in a bowl, cutting up with kitchen shears and then crushing using a potato masher.
I think the dish could have benefitted from some crushed red pepper flakes. Maybe next time, but wouldn't want to make it too spicy for some who might not like too much spice. Also curious to see if the dish will be more flavorful with Chanterelles instead of Crimini. We'll see next week if that is the case.
Last, I believe the beauty of this dish is using ripe in-season ingredients. In retrospect it's more of a spring time dish which doesn't really fit for winter. We had to use frozen peas and our tomatoes were definitely not the best in season. The dish would probably have tasted more flavorful and fresh if using fresh picked ingredients.
Substituted the much cheaper Crimini Mushroom
 Prosciutto
peeled, seeded, crushed plum tomatoes

Sautee the garlic and prosciutto together
 Add mushrooms
 Add peas and tomatoes
 Add pasta season well w/ salt/pepper (note we used pinwheel pasta here instead of bucatini)
Subscribe to:
Posts (Atom)